Adobe Premiere Pro Review
Adobe Premiere Pro Review
Adobe Premiere Pro earns its status as industry-standard video editing software, thanks to its familiar nonlinear editing interface, unmatched ecosystem of tools, and powerful capabilities.
Adobe Premiere Pro is widely considered to be the gold standard of professional quality video editors. Its color, lighting, and audio adjustment tools blow its direct competition completely out of the water.
If you’re in need of a tool to make your footage jump off the screen, look no further than Premiere Pro. Many of the features and effects in Premiere Pro will feel familiar to those with experience in the Adobe Creative Cloud. One of the greatest selling points for Premiere Pro is its seamless integration with other Adobe programs, most notably After Effects.
If you’re willing to fork up a bit for the combination of Premiere Pro and After Effects (or $49.99/mo for the entire Creative Cloud), I think you’ll find this combination of these programs to be better than anything else on the market.
What I Like: Integrates with the Adobe Creative Suite. The preset audio modes are stunningly fitting to their descriptions. Workspaces and keyboard shortcuts make the program a breeze to use once you get the interface down. The color and light correction features are as phenomenal as you’d expect from the company that made Photoshop.
What I Don’t Like: The subscription-based pay model. Massive number of effects & features make it difficult to find basic tools. Many of the built-in effects look tacky and are largely unusable. A bit of resource hog. Complex effects tend to slow down or break the preview window.
Since our last look at the massive application, it has simplified both the import and export experiences and added automatic caption generation, integration with Frame.io, and many other features. All this makes Premiere Pro well worthy of our Editors’ Choice award for professional-level video editing software. For enthusiast-level users, our Editors’ Choice programs are Corel VideoStudio and CyberLink PowerDirector.
How Much Does Adobe Premiere Pro Cost?
Premiere Pro is now only available by subscription. You can get it for $20.99 per month with an annual commitment or $239.88 if you pay for a year upfront (that works out to $19.99 per month). A month-to-month option with no commitment costs $31.49 per month. The free trial option is now a measly seven days, but it does give you a chance to kick the program’s tires.
- Annual: paid monthly, $20.99/month
- Monthly: $31.49/month
- Annual: prepaid, $239.88/year
You can also get Premiere Pro as part of the complete suite of Adobe Creative Cloud professional applications that includes Photoshop, Illustrator, After Effects, and the rest. That costs $52.99 per month with an annual commitment or $74.99 month-to-month. A full year paid upfront for the suite costs $635.88. Business customers pay more for either package, at $33.99 per month per user for the single app or $79.99 for the whole suite. The Business version adds enhanced support, management, and collaboration options.
Because Premiere is sold as a subscription, the immediate dent in your pocketbook is lessened compared to back when you had to plunk down $800 all at once to buy a perpetual license. Additionally, the subscription-based application gets regular updates with improvements and new features.
Price Comparison
- Adobe Premiere: $20.99/month
- Avid Media Composer: $23.99/month
- Final Cut Pro: $299.99 one-time
- Blackmagic’s DaVinci Resolve: Free
Adobe Premiere’s most popular plan is $20.99/month for an annual plan. Users can also prepay annually for $239.88/year or month-to-month for $31.49/month. On any plan, editors get access to updates for no additional cost.
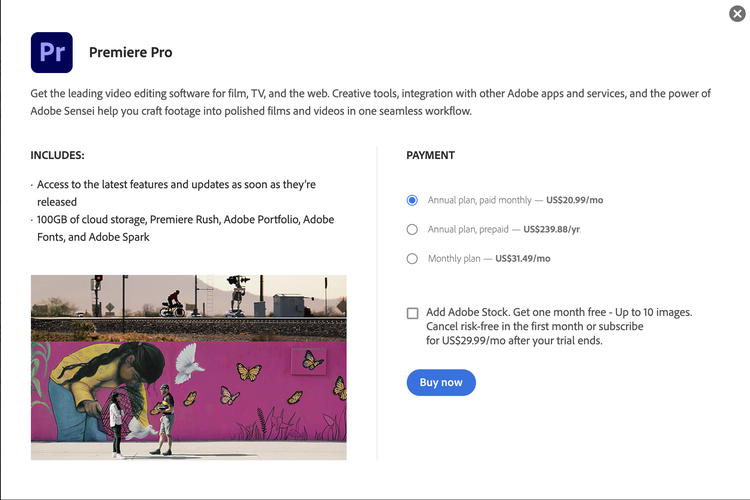
Pricing for Premiere Pro broken down into monthly and annual plans. Image source: Premiere Pro pricing website.
The pricier Avid Media Composer is popular for TV editing, while Final Cut Pro is popular among Mac users. DaVinci Resolve is used for top-tier color grading and compositing, so it’s surprising it’s free.
But Adobe begins to get expensive if you need access to more applications. For example, if you design assets in After Effects or Photoshop, you’ll need to purchase those, too. There is not a “video editing” bundle from Adobe so you’ll either have to pay for apps individually or pay for all of Creative Cloud’s apps. The price for all creative apps is a reasonable $52.99/month, Adobe’s most cost-effective plan.
The Adobe Premiere Pro free trial is a great way to go if you’re not ready to commit to the software.
For comparison, Final Cut Pro carries a one-time cost of $299, and DaVinci Resolve is $295, though that one offers a very capable free version. The nonprofessional programs that target consumers who enjoy creating dazzling videos without the steep learning curves hover around $99 for a one-off purchase. That’s what you pay for Adobe Premiere Elements and Pinnacle Studio; CyberLink PowerDirector Ultimate is now $139.99 one-time or $69.99 per year for a subscription ($5.83 per month). A less-expensive tier of editors runs about $70 outright and includes names like Movavi and Filmora.

(Credit: Adobe/PCMag)
Add in full integration with the likes of Audition and After Effects, Adobe’s premium VFX software, and you’re suddenly working with a comprehensive, professional post-production suite.
The non-linear video editor is available on Windows and Mac with a Creative Cloud subscription (bad news for those looking for the best free video editing software – although we’ve covered how to download Adobe Premiere Pro on a free trial).
Adobe premiere Pro Pros And Cons
Pros
-
Clear, flexible interface
-
Many organization and collaboration tools
-
Responsive speed and fast rendering
-
Excellent stabilization tool
-
Unlimited multicam angles
Transcription & captioning tools
Automatic audio remixing
Multiplatform
Cons
- –
Subscription only
- –
Can be overwhelming to beginners and Adobe freshmen
- Some techniques require additional applications, such as After Effects or Media Encode.
- No support for MKV file format.
- Audio editing could be friendlier to beginners
Adobe Premiere Pro Main Features
The UI

The editing software is organized into seven main areas, which can be seen at the top of the screen. Going from left to right you’ll see Assembly, Editing, Color, Effects, Audio, Graphics, and Libraries.
While most other video editors opt for a drop-down menu approach to their UI, Adobe decided to organize the program in a way which highlights the current task you are using. This allows Adobe to present more features per screen than other programs.
However, the UI also comes with some drawbacks. Most tasks can only be performed within their parent area, which means you’ll have to do a lot of bouncing around to find what you need. Fortunately, the keyboard shortcuts in Premiere Pro are extremely useful and will save you tons of time if used properly.
Adobe Premiere Pro has a straightforward, intuitive interface layout — it’s one of the reasons those with limited video editing experience can hop right in. There are six main workspaces editors spend most of their time in:
- Assembly: Use this workspace to easily import and organize all your projects assets like footage, graphics, and audio.
- Editing: The main workspace, ideal for creating and editing videos from start to finish.
- Color: The color correction and color grading workspace.
- Effects: Hop into this workspace to drag and drop effects and presets.
- Audio: Shows individual controls over audio channels and other advanced audio-mixing options.
- Graphics: Create and tweak motion graphics from scratch or from templates.
The above workspaces can be easily customized, or users can create their own. Within each workspace, there are four main panels that are consistent:
- Project Panel: You’ll find all those imported assets organized here.
- Source Monitor: Assets from the project panel can be reviewed here.
- Preview Monitor: This panel shows what is playing on your timeline.
- Timeline: All footage, audio, and graphics are pieced together to create videos here.
The organization of workspaces and panels in Premiere make the video editing workflow simple and intuitive.
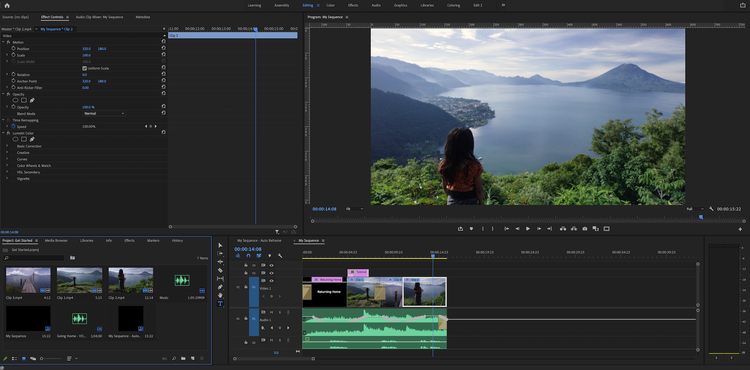
The simple and organized layout of Premiere Pro workspaces and panels. Image source: Premiere Pro software.
Assembly
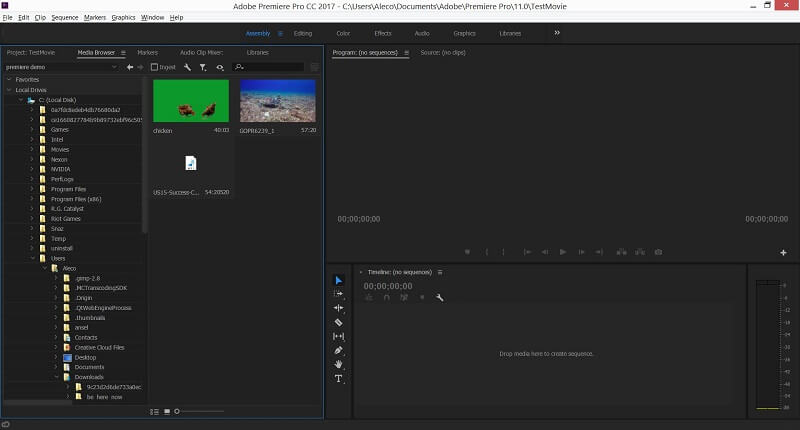
The first area is the Assembly menu, which is where you import files from your computer into your project. Though it’s fairly self-explanatory to import files into the program, it should be noted that this is the first video editor I have ever used where I couldn’t drag and drop a file into the program from a folder on my computer.
Editing and Tools
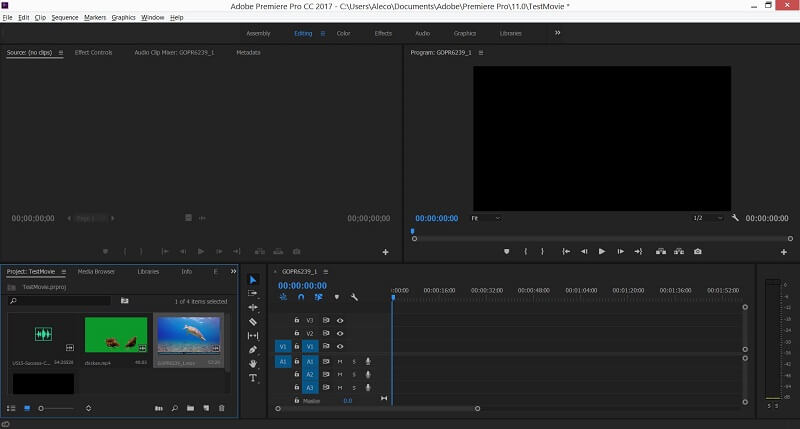
The editing area is where you’ll splice together and organize the audio and video files in your project. It’s pretty straightforward to use: Just drag and drop your imported files into the timeline to start moving them around. The editing area is also where you’ll get your first glance at the “tools” in Premiere Pro:

Here you can see I have the selection tool highlighted. It’s the default tool you use to select the elements of your project and move them about. Your cursor will change to reflect the current tool you have selected.
I have to say that I feel a little dubious about the necessity of tools in Adobe Premiere Pro. They make a ton of sense in Photoshop, but I can’t help but feel as though competing video editors are able to present the same features in a more intuitive way. There is something to be said for keeping the UI consistent across the Adobe Creative Suite, but the tools in the program might feel a bit clunky or unnecessary to people who are familiar with other video editing programs.
Multicam editing
You’ve just shot a corporate interview with multiple cameras and now you’re tasked with clipping the footage together. It’s a lot of footage with many takes and different camera angles. Premiere Pro’s multi-cam editing tool is the way to go.
Users can select all applicable footage and audio and convert them into a multi-cam sequence. The content will automatically be synced up and timed properly. All that’s left for you to do is scrub through the sequence and select which camera you want and when.
Auto reframe
It’s a small feature, but it’s immensely useful. It’s tailored toward those editing and exporting videos to platforms with different frame sizes. For example, Facebook works primarily in a 16:9 (landscape) aspect ratio, Instagram typically uses 1:1 (square), and TikTok usually works in 9:16 (portrait).
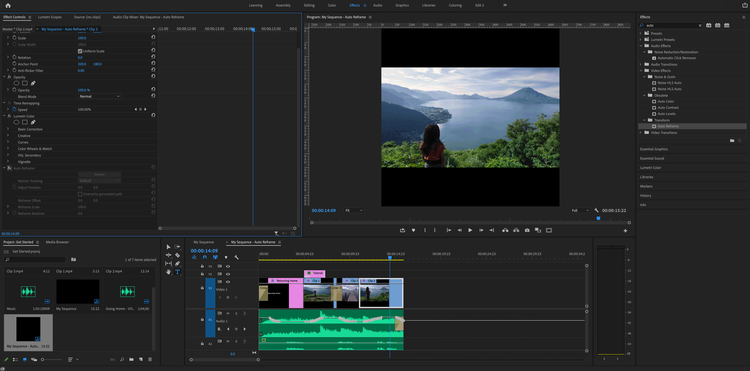
A before and after of the Auto Reframe effect on a clip within Premiere Pro’s timeline. Image source: Premiere Pro software.
In order to keep the focal point in the shot across different aspect ratios, footage needs to be reframed. Auto reframe will track the subject and move the framing to fit all the essentials into the shot. It’s not always perfect, so users can fine-tune the motion as needed.
-
Roll, Ripple, Slip, Slide

Editing tools indicated by red oval: Roll, Ripple, Slip, Slide
There are 4 ways to edit your clips in Adobe Premiere Pro. This might seem either obvious or overkill to you depending on your editing experience but don’t underestimate the possible time savings involved.
In construction, they say it’s all about using the right tool for the project, the same is true for video editing.
A rolling edit adjusts a point between two clips without affecting the rest of the timeline. This is a simple and straightforward tool that allows you to trim a clip to the proper length.
However, if you adjust the clip length you’ll have a gap that you then have to clean up if you’re not adding a new clip into that gap.
This brings us to the ripple edit which adjusts the point between two clips while allowing the rest of the timeline to compensate. The ripple effect shifts all the other clips into a new position.
Be careful if you’ve already timed everything to music or have multiple tracks as this tool can create a global mistake rather than a local one.
A slip edit changes the timing of a clip but not the length, it doesn’t impact other clips in the sequence.
You’ll slip the clip if you want to have that clip start a little sooner for example, which is way more efficient than making it longer on one side and then shorter on the other and then trying to fix the length and then put all the other clips back into place.
A slide edit slides a target clip left or right maintaining the length of the clip while adjusting the length of the neighboring clips to compensate.
These four different tools allow for fast and efficient editing, once you learn them and remember what makes them each different.
-
Rate Stretch

Once you master the main editing tools, there might be another instance in which you need to make a clip fit a certain timing but you want to do it by slowing down or speeding up the clip rather than lengthening or shortening it.
The rate stretch tool allows you to do just that. There might be a more elegant way to fine-tune the speed of your clip but the rate stretch tool is fast and easy.
-
Keyboard Shortcuts

Another way to ensure faster and more efficient editing is to familiarize yourself with the keyboard shortcuts.
Adobe products have menus upon menus upon menus and you’ll save yourself a lot of time by learning some shortcuts for some of your most-used tools.
All of our editing tools previously mentioned have shortcuts. B for ripple, N for rolling edit, R for rate stretch, y for slip, and U for slide.
V is for the selection tool, a tool you’re likely to use over and over again, so finding a quick way to get back to it can cumulatively save you a ton of time.
Other useful shortcuts are Z for zoom, H for hand, C for razor. You’ll notice that some of them are intuitive like zoom or you can even think ‘Cut’ for razor for the z but beyond that, you’ll just have to practice.
Alternatively, you can get a keyboard cover like my one above to help you learn and eventually memorize your most-used shortcuts.
Color

The Color area is perhaps the biggest selling point of the entire program. The amount of control you have over the color in your video is phenomenal. The UI for this area is responsive and highly intuitive to anyone with even a shred of experience in video or photo editing.
On the left side of this area, you get a very detailed look at the color data in your video clips, which is probably cooler than it is useful for the average user.
Lumetri Color
I know I said Premiere’s color grading tools “could be better.” But, that doesn’t take away from the efficiency and accessibility of Lumetri Color — Premiere’s color grading suite. Although Lumetri isn’t as robust as DaVinci Resolve or the Colorista plug-in, it is perfectly capable of handling the needs of everyone besides a professional colorist.
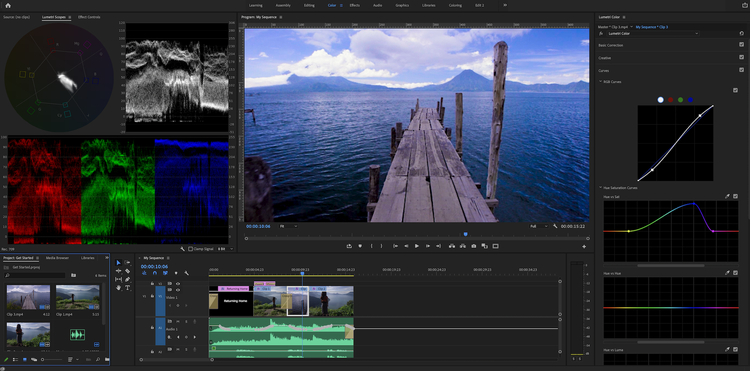
The Curves tool in Premiere Pro used for color correcting and color grading footage. Image source: Premiere Pro software.
Lumetri’s basic color correction panel is straightforward enough that beginners can properly correct their footage. Other panels, such as curves and color wheels, aren’t too difficult to learn and can add real creativity to your footage.
Premiere is also optimal for LUTs, or look-up tables. These act as filters and can be dropped right onto footage, no experience required. Premiere comes with a good amount of LUTs by default, and plenty more are available for download.
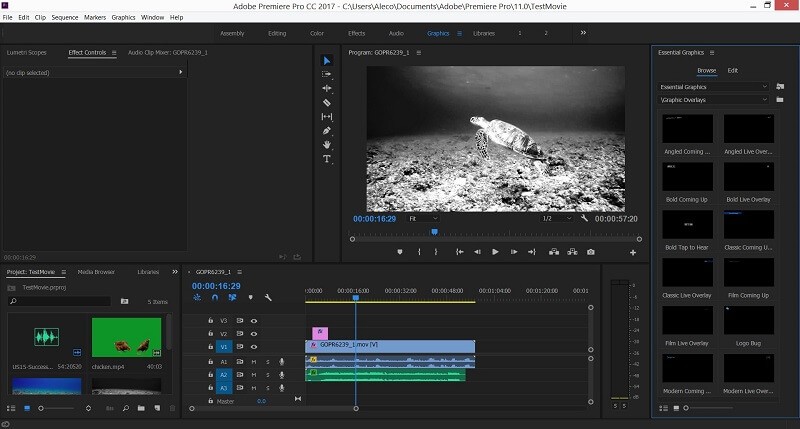
Effects
The effect area is where you apply ready-made effects to your audio and video clips. Clicking on an effect on the right of the screen sends its parameters over to the menu on the left side of the screen, which is called the Source Monitor. The Source Monitor enables you to adjust the various settings of the effect.
Once I got used to this method for applying effects, I really liked it. Other video editors generally require you to navigate a series of pop-up menus to apply effects, while Adobe’s method allows you to quickly select, apply, and adjust settings with as few steps as possible. It was extremely easy to copy effects I had already applied to one clip and paste them into another.
Adobe Premiere Pro classifies many things I wouldn’t have expected as effects. Basic changes, such as adjusting the alignment of your video within the frame or applying a chroma key (green screen), are accomplished by applying an effect. The word “effect” might be better described as “modifier”. Pretty much anything that modifies your video or audio clip in any way is categorized as an effect in Premiere.
The vast majority of video effects apply some kind of color scheme to your video clips. Many seem quite similar to one another, but this fine-grain approach to crafting perfect color and lighting schemes is exactly what professional editors need.
Beyond the color modifying effects, there are also a handful of more complex effects which distort or modify the content of your videos. Unfortunately, the majority of the more interesting ones put a major strain on my computer’s resources. With a more complex effect such as “strobe light” applied to my clip, the video preview window became uselessly slow. The program either froze, crashed, or needed to be restarted every time I applied one of these complex effects, which is something that never happened to me when I tested VEGAS Pro on the same machine.
Simple effects like “sharpen” or “blur” worked just fine on their own, but enough of them added together caused the same problems which complex effects did. I was still able to render every effect I tested without any issues but was unable to properly view most of them in the preview window before doing so. To be fair, Premiere Pro clearly wasn’t designed to be a special effects editor. That’s what Adobe After Effects is for.
Audio
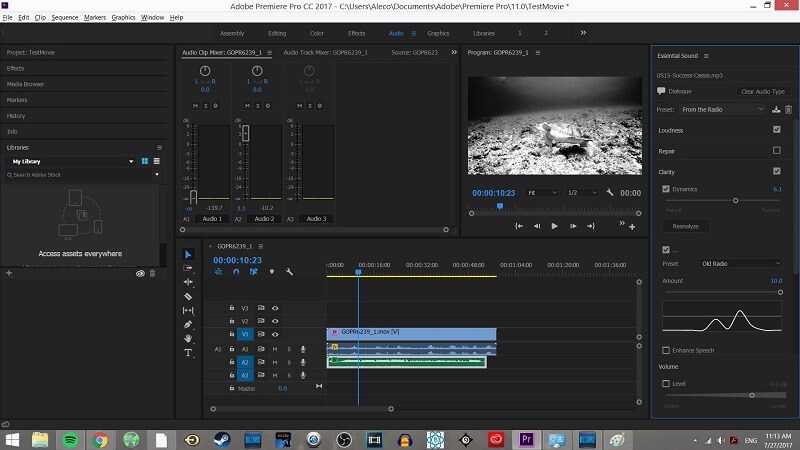
This brings us to the audio area, which I found to be one of the most impressive parts of the entire program. The tools for tweaking your audio are nearly as fine-grain as the tools for color and lighting. The presets are shockingly accurate to their descriptions as well, “from the radio” or “in a large room” will make your audio sound exactly as described.
Premiere has some excellent audio editing tools such as the automation modes in the track mixer or the ability to assign audio types in the Audio workspace. Users with midrange audio mixing experience will appreciate the audio strengths Premiere Pro has to offer.
But, beginners may have a tough time sound designing. Basic audio settings like volume and panning are easy enough to figure out — and that may be all your edit needs. The more advanced features used to really fine-tune the audio edit will have a steeper learning curve. This deficiency may be less about the Premiere video software and more about the overall difficulty of audio editing.
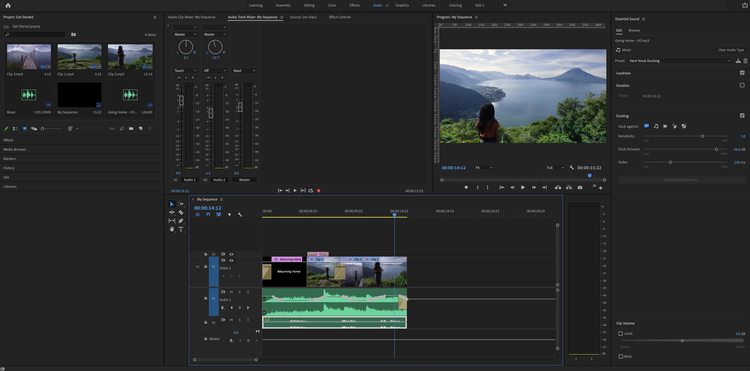
The Audio workspace in Premiere Pro displaying the track mixer’s automation mode and audio type panel. Image source: Premiere Pro software.
Graphics
The graphics tab is where you can apply all sorts of generated content to your movie. Titles, vignettes, text backdrops, or anything else which needs to appear on top of your video can be found here. Just drag and drop the generated content directly into your video’s timeline and it’ll become a new element which you can modify however you chose. The graphics area is one of Premiere Pro’s many strong features.
Motion graphics
The latest update from Adobe makes adding motion graphics to videos a whole lot simpler. The Graphics workspace allows users to choose a motion graphic template and drop it right into the timeline. Users can change the text, move the position, change timing, and more.
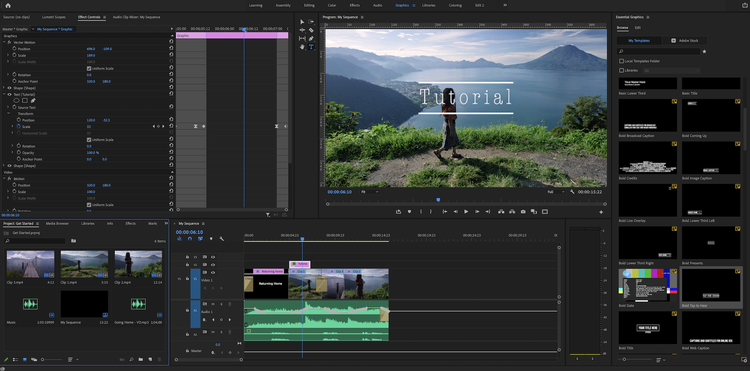
Selection of motion graphics templates in the Graphics workspace of Premiere Pro. Image source: Premiere Pro software.
If you prefer the full control of After Effects, Adobe Dynamic Link is still the way to go. Designers can enjoy real-time updates between After Effects and Premiere Pro using this popular Adobe feature.
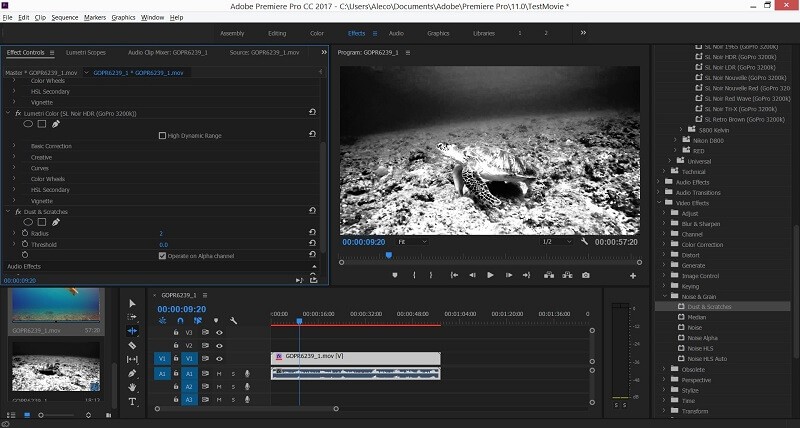
Effects and the adjustment layer
Premiere Pro comes with a decent amount of preset effects to drag and drop onto video clips. The effects range from simple video and audio transitions to more complicated visual effects.
If you’re a beginner, some of the effects are basic enough to be quickly added to videos without much, or any, tweaking. If you have some experience, a majority of the effects allow for complex edits and fine-tuning.
If you’ve ever used Photoshop, you’ll be familiar with adjustment layers. Premiere’s adjustment layers work the same way and can be used to hold effects or color adjustments. The perk is the effects are nondestructive and can apply to many video clips.
Libraries
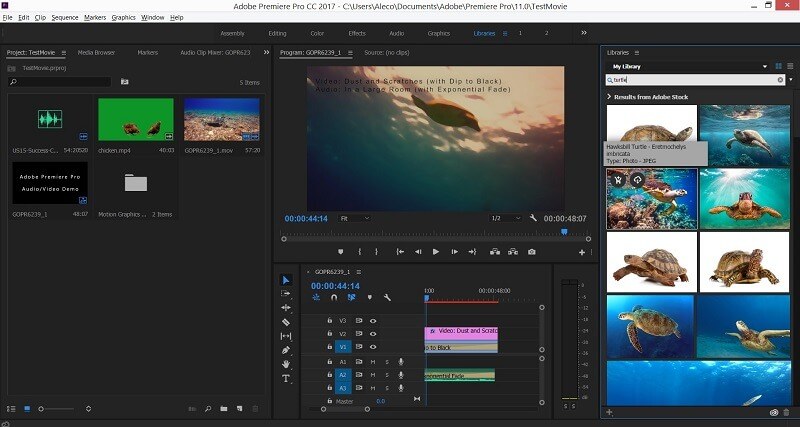
In the libraries area, you can search through Adobe’s enormous database of stock images, videos, and templates. It’s super convenient to have such high-quality images and videos be so readily available, but everything in Adobe’s library requires an additional license to be purchased before they can be added to your project. Quality doesn’t come cheap with Adobe.
Workspaces

The final element in the navigation toolbar is workspaces. Workspaces are like snapshots of a work area which allow you to quickly bounce between the places in your project you use the most. I found this feature to be extremely convenient and love that you can swap between workspaces by using a keyboard shortcut.
If you accidentally close something and can’t find what you’re looking for, don’t worry. All you need to do is reset your workspace.
A workspace is the layout in which various windows or panels are organized into a layout to help you with your workflow.
There are default workspaces designed for specific tasks such as editing, color, audio, graphics, and so on. The window menu is where you can find your workspaces.
You can also create custom workspaces or edit the default workspaces.
In the beginning, all of the panels can be overwhelming and confusing, you might not know how to find what you’re looking for. As your editing style develops and grows, you can customize your workspace accordingly so that it’s efficient and effective for your needs.
Rendering
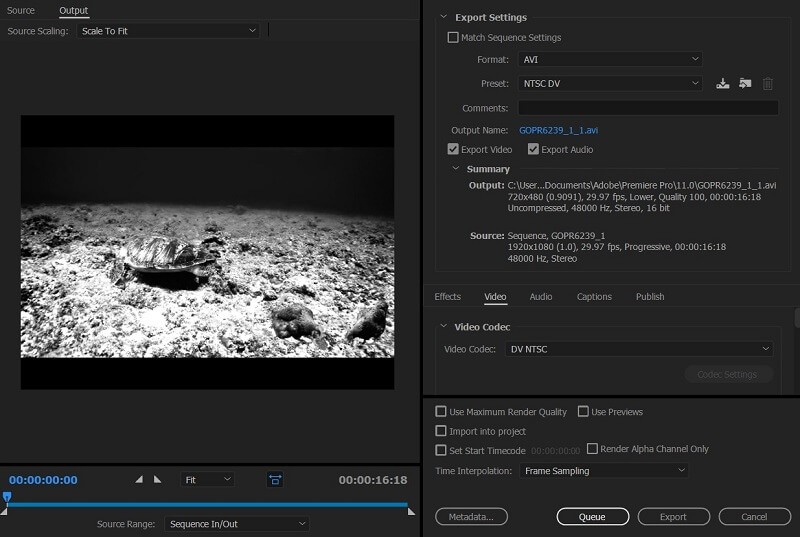
The final step to any video project is rendering, which was extremely simple and painless with Premiere Pro. Just select your desired output format and let Adobe do the rest.
Can My PC Run Premiere Pro?
The cross-platform program runs on macOS 10.15 or later and on Windows 10 version 1909 or later and Windows 11, with the 64-bit versions required. On Windows, it requires an Intel 6th-generation or newer CPU or an AMD Ryzen 1000 Series or newer, 8GB of RAM (16GB recommended), and a 1,920-by-1,080 display. On Apple computers, Premiere Pro requires an Intel 6th-generation or newer CPU but now has native Apple Silicon M1 and M2 support. M2 is fully supported since June 2023.
When you install Premiere, you also get Adobe Media Encoder, which converts output to a wide variety of formats for online and broadcast. It also enables batch processing and lets you keep editing while rendering.

(Credit: Adobe/PCMag)
What’s New in Premiere Pro?
Adobe does a big update for Premiere Pro at least once a year, and this year has produced some biggies. Below are the standout new features in recent updates.
Automatic transcription and text-based editing (beta). This was the big Adobe news at NAB 2023. Not only can Premiere Pro transcribe spoken audio in your clips, but it also lets you edit—that is, split, merge, move, or delete—segments of video, based on the transcription. It also can generate captions. Note that this feature is only available if you install the separate beta version of Premiere Pro. Note, too, that DaVinci Resolve recently got a very similar capability.
Productions. These are supersets of projects, offering a higher level of hierarchy for your video work. You can move or copy media between projects within productions via drag and drop. So, now there’s a three-level nested hierarchy when editing in Premiere Pro: sequences, projects, and productions. Each can contain multiple items of the previous level, with the sequence being the lowest level containing timeline tracks.
Interface changes. Adobe has simplified both the import and export experience to be less text-filled and more visual and automatic. The detailed options are still available for those who want to dig into them. New also is a simplification of the main modes (customizable) to just three: Import, Edit, and Export.
Frame.io integration. Adobe purchased the online video editing collaboration service last fall, and the fruits of that acquisition can now be enjoyed inside Premiere Pro. Users get an account and 100GB of online storage.
Copy and paste audio effects. You can now copy combined audio effects and paste them to another audio clip rather than doing so for each effect separately. Some legacy audio effects have been replaced, so you have to update existing projects with new ones.
Learning tools. A Learning mode option now appears at the top of the screen, and the welcome page offers eight interactive tutorials that can take you over the main tasks needed for creating a movie—importing, preparing clips, adding titles, working with color, editing audio, and so on.
Auto Reframe. With so much emphasis on social videos these days, it’s often necessary to use aspect ratios other than the standard widescreen, including vertical formats favored by smartphone screens. Adobe’s Auto Reframe can automatically change the crop selection for these formats, keeping the subject in view.
Adobe Sensei introduction
Sensei is the name of Adobe’s AI system, which is present throughout its software catalog. Here, it’s used to help in some cool and interesting ways.
One of these is Remix. This is a tool designed to retime songs so your chosen tune fits the video perfectly. Usually this is a painstaking process, involving a lot of cuts, fades, and trial and error to make it work.
We tested this with an original song, to remove any possibility that the AI was basing its knowledge on some well known track, and we were mightily impressed.
The process took a few seconds to perform (this undoubtedly depends on your CPU’s prowess), but the end result was excellent.
Premiere Pro’s Interface
Premiere Pro has an attractive, flexible interface, and I’m a fan of the simplifying changes Adobe brought to it in the April 2022 update. The startup view helps you quickly get to projects you’ve been working on, start new projects, or search for Adobe Stock footage. The dark program window makes your clips the center of attention. Before, it showed workspace options for Assembly, Editing, Color, Effects, Audio, and Titles. it now just has three, for Import, Edit, and Export. You can edit these or create custom workspaces, and even pull off any of the panels and float them wherever you want on your display(s). You can create content bins based on search terms, too.
One thing missing from the interface is a permanent search box for finding commands, content, or help; other major apps, including Adobe’s own Photoshop and Microsoft Office, now include this helpful interface element.
By default, the editor uses a four-panel layout, with the source preview at the top left, a project preview at the top right, your project assets at the lower left, and the timeline tracks along the lower right. You can add and remove control buttons to taste; Adobe has removed a bunch by default for a cleaner interface. Since many editors rely on keyboard shortcuts like J, K, and L for navigating through a project, fewer buttons and a cleaner screen make a lot of sense. It’s a very flexible interface, and you can undock and drag around windows to your heart’s content. Here’s another helpful feature: When you hover the mouse over a clip in the source panel, it scrubs through the video.

(Credit: Adobe/PCMag)
Premiere Pro is touch-screen-friendly, letting you move clips and timeline elements around with a finger or by tapping buttons. You can also pinch-zoom the timeline or video preview window. You can even set in and out points with a tap on thumbnails in the source bin.
When you click on a media thumbnail, you get a scrubber bar and can mark in and out points right there before you insert the clip into your project. Premiere offers several ways to insert a clip into your sequence. You can click the Insert or Overwrite buttons in the source preview monitor, or you can just drag the clip’s thumbnail from the media browser onto the timeline or the preview monitor. Holding Command (or Ctrl on Windows) makes your clip overwrite the timeline contents. You can even drag files directly from the OS’s file system into the project.
The media browser also has tabs for Effects, Markers, and History, the last of which can help you back to a good spot if you mess up. Markers, too, have been improved, with the ability to attach notes and place multiple markers at the same time point. Markers can have durations in frame time codes, and the Markers tab shows you entries with all this for every marker in a clip or sequence. Clicking on a marker entry here jumps you right to its point in the movie.
Any device that can create video footage is fair game for import to Premiere Pro. The software can capture from tape, with scene detection, shuttle transport, and time-code settings. It also imports raw file format from pro-level cameras like the Arri Alexa, Canon Cinema EOS C300, and Red Epic. Resolutions of up to 8K are supported. And, of course, you can import video from smartphones and DSLRs, as well. For high-frame-rate video, the program lets you use proxy media for faster editing.
If you’re moving up from the consumer-level Adobe Premiere Elements, you can import your projects, especially since they use the same .PREL file format. But note that you may lose some effects, even things like image filters and motion tracking.
Importing Media Into Adobe Premiere pro
The latest version of Premiere Pro has a focus on your media. This is apparent from the very start, with a redesigned import window that showcases your clips above all else.
Locate them, select the ones you wish to work with, and click on Import. A new project will be created for you. Those clips will be added to your sequence. No need to fiddle with settings, or anything like that.
Of course, nothing stops you from altering your Sequence Settings after the fact, which is crucial if you need to create a project for a specific social media format.
But more often than not, just getting right down to working with your clips in their native format will be what people choose to do. This removal of potentially unnecessarily complex tweaking is most welcome.
Trimming Project Clips in Premiere Pro
Premiere Pro continues to offer the four edit types that sound like they belong at a waterpark—Roll, Ripple, Slip, and Slide—and adds a Regular Trim mode. They’re all easily accessible at the left of the timeline. The cursor shape and color give visual cues about which kind of edit you’re dealing with. One welcome capability is that you can make edits while playback is rolling.
In a nice touch, holding down the mouse button while moving a clip edit point (or double-clicking on an edit point) opens a view of both clips in the preview window. If you double-click on the edit point, it switches to Trim mode, which shows the outgoing and incoming frames, with buttons for moving back and forward by one frame or five and another to apply the default transition.
As with Adobe Photoshop image layers, layer support in Premiere Pro lets you apply adjustments. These will affect all tracks below them. You create a new adjustment layer by right-clicking in the project panel. Then, you drag it onto a clip on your timeline and start applying effects.
Adding Transitions and Effects in Premiere Pro
If you’ve been reading my recent reviews of enthusiast-level video editing software, you may be surprised to learn that Premiere Pro includes just 47 transition options by default (you can of course install plugins for more). This is because in the pro community, most of those hundreds of transitions offered by the likes of CyberLink PowerDirector are considered tacky—if pros want to do fancy transitions, they build their own striking, custom ones in After Effects or buy polished premade ones via third-party plug-ins.
Otherwise, all the video effects you’d expect are present—keying, lighting, colorizing, and transforming. You can apply an effect just by double-clicking. A search box makes it easy to find the effect or transition you need.
The Warp Stabilize feature, brought over from After Effects, is very effective at smoothing out bumpy video. Adobe has sped up this formerly slow frame-by-frame process. In testing, smoothing out a 1:33 (min:sec) clip from a moving tram took 2:38, but all but the biggest shakes were pleasingly smoothed out. You can adjust the amount of cropping, tweak the percent smoothness, and make the borders auto-scale. A cool option is No Motion, compared with the default Smooth Motion. Using this with Stabilize Only (as opposed to adding Crop, Autoscale, or Synthesize Edges) resulted in a weird (and unusable) zooming in and out with rotation in my test, so be careful which settings you use. The result with default settings was noticeably smoother than that produced by Final Cut Pro X in my testing.
Premiere Pro Collaboration
Premiere Pro lets you use Creative Cloud Libraries to store and organize assets online, and the Team Projects feature lets editors and motion graphics artists using After Effects collaborate in real time; you simply designate team members when creating the project. Any Premiere user can sync settings to Creative Cloud, for editing from different PCs and locations.

(Credit: Adobe/PCMag)
This also means that editors can go to any machine running Premiere and see their environment tweaks duplicated by signing into the cloud. Getting this kind of collaboration and workflow capability in Final Cut Pro requires third-party extensions, and consumer-targeted products like PowerDirector offer no collaboration features to speak of.
Frame.io Integration
A key component of collaboration in Premiere Pro is its inclusion of Frame.io, which Adobe acquired in the fall of 2021. Premiere Pro subscribers now also get a Frame.io account, with 100GB of online storage. That’s separate from the 100GB Creative Cloud storage they also get. A help video and sample project tutorial are promoted on the program’s Welcome page to get new users started with the service. Once your project is ready to share with collaborators and stakeholders, you open the Review with Frame.io panel, accessible from the Window menu. You need to log in with your Adobe account again for this to work. This opens a webpage, but it also populated the panel with your shareable projects.

(Credit: Adobe/PCMag)
For each project thumbnail, you get choices of Share for Review, Share as Presentation, Import File, Download File, Open File in Browser, Change Status, Make Private, and Delete. When you open a similar panel in a web browser, you see more choices, including Publish to Vimeo or Dropbox, Copy to…, and Duplicate. The web view of a project saves collaborators and reviewers from having to have Premiere installed, and it provides a good viewing experience. In either interface, thumbnails feature hover scrub. Teams can organize projects into groups and set

(Credit: Adobe/PCMag)
The Share as Presentation lets you include a watermark in the shared video, but that requires an upgraded Frame.io account, starting at $15 per user per month. It’s a rich commenting environment, with the ability to indicate time codes and to draw on the screen to point out areas of interest. When you click on a comment in the Review window, the timeline snaps to the place in the timeline the comment is about.
One Frame.io feature that Adobe has particularly touted is Camera to Cloud. As the name suggests, this allows direct uploading from a video camera to Frame.io. This requires a professional video camera costing thousands along with a Teradek Cube transmitter device that costs a couple thousand more. In truth, both Camera to Cloud and Frame.io are beyond the needs of this article’s mostly consumer hobbyist reader audience, but it’s interesting tech nevertheless.
Auto Reframe in Premiere Pro
A good chunk of today’s video content is destined for social media, which means different aspect ratio formats. Auto Reframe uses Adobe’s Sensei AI technology to identify what’s important in the frame and then crop to 16:9, square, vertical, or custom aspect ratios to match the output device or service. You can use the tool on individual clips or entire sequences.

(Credit: Adobe/PCMag)
You can either drag the video effect onto a clip or choose Auto Reframe from the Sequence menu. You then choose the output aspect ratio; slower, faster, or default motion tracking, and whether you want clip nesting.
Facebook, Instagram, Snapchat, YouTube, and Vimeo, as well as broadcast outlets, all have different spec requirements, so the feature saves video producers the work of having to custom edit for each. At the very least, Auto Reframe gives producers a starting point, since it offers a Nested option, meaning you can adjust its automatically created keyframes to taste.
Apple now has a similar tool in Final Cut Pro called Smart Conform. It’s nearly identical to Auto Reframe, though there’s only one way to get to it, unlike Premiere Pro’s two options. Smart Conform also bases the crop on your project aspect ratio setting, rather than creating new aspect-ratio versions to taste. One thing I prefer about Final Cut’s feature is that it lets you see how the effect worked by showing the full frame outside the automatically cropped area.
360-Degree VR Video in Premiere Pro
Premiere Pro lets you view 360-degree VR footage and change the field of view and angle. You can view this content in anaglyphic form, which is a fancy way of saying you can see it in 3D using standard red-and-blue glasses. You can also have your video track a head-mounted display’s view.

(Credit: Adobe/PCMag)
The program, however, couldn’t open my Samsung Gear 360 footage unless it was already converted to equirectangular format. Corel VideoStudio, CyberLink PowerDirector, and Pinnacle Studio can all open the footage without this conversion. You can’t see the spherical view alongside the flattened view as you can in those apps, either, but you can easily toggle back and forth between these views if you add the VR button to the preview window. Helpfully, Adobe’s tool lets you tag a video as VR so that Facebook or YouTube can tell it’s 360-degree content.
Multi-Camera Angle Editing in Premiere Pro
Multicam in Premiere Pro can accommodate an unlimited number of angles, limited only by your system capabilities. Final Cut Pro X lets you work with only 64 angles, though most projects won’t need more. In Premiere, you select your clips and choose Create Multi-Camera Source Sequence from the right-click or Clip menus, and then choose a syncing method. The program does a good job of syncing clips based on their audio, which is helpful for DSLR-shot clips, since they have no time codes. As in Final Cut, a Multi-Camera Monitor lets you record angle changes as the composite video plays, either by simply clicking on the angle’s tile or the corresponding number. You can then adjust the cuts with the normal editing tools.
Premiere Pro Color Adjustments and Effects
The Lumetri Color Tools in Premiere Pro brings the program up to the status of Photoshop for video. These tools offer a remarkable amount of color manipulation, along with a great selection of film and HDR looks. You can adjust white balance, exposure, contrast, highlights, shadows, and black point—all of which can be activated with keyframes. Saturation, Vibrance, Faded Film, and Sharpen adjustments are also available. But the curves and color wheel options are impressive, and include a Color Match feature with comparison views. There’s also a very cool Lumetri Scope view, which shows the current frame’s proportional use of red, green, and blue.

(Credit: Adobe/PCMag)
You can opt to apply any of these effects only in masked areas, which you can create from polygons or by using a pen tool. For motion tracking, however, you need to look to After Effects, so those masks won’t automatically track, say, a face.

(Credit: Adobe/PCMag)
Auto Color is something we’ve seen in photo editing software for many years, but Adobe claims the new tool analyzes an entire clip using its patented Sensei AI technology to improve exposure, white balance, and contrast. Unfortunately, it only works on a per-clip basis; it would be nice if you could apply it to your whole sequence, that is, the group of clips and overlays that comprise your digital movie. As you can see in the screenshot above, after pressing the Auto button, you can see what adjustments Auto Color made, and tune them to your taste. In testing on several clips, it did improve not just the color but the lighting, though occasionally pumping up saturation too much for my taste. Dark or light shots were improved, however.
Audio Editing in Premiere Pro
Premiere Pro’s Audio Mixer shows pan, balance, VU meters, clipping indicators, and mute/solo for all timeline tracks. You can use it to make adjustments as the project plays. New tracks are automatically created when you drop an audio clip in the timeline, and you can specify types like standard (which can contain a combination of mono and stereo files), mono, stereo, 5.1, and adaptive. Double-clicking the VU meters or panning dials returns their levels to zero.
The audio meters next to your timeline are resizable and let you solo any track. The program also supports hardware controllers and third-party VSP plugins. If you have Adobe Audition installed, you can roundtrip your audio between that and Premiere for advanced techniques such as Adaptive Noise Reduction, Parametric EQ, Automatic Click Removal, Studio Reverb, and compression.

(Credit: Adobe/PCMag)
For background music, you can choose from a large selection, some free, some extra-cost, from Adobe Stock. You find these within the Essential Sound panel, which also lets you designate your audio tracks as Dialog, Music, SFX, or Ambience. Switch to the Browse tab to find background music, which you can filter by mood or search by term. None of these can auto-fit your project length as many video programs can, and there are no sound effect samples like drum hits or car horns, again, offered by most consumer software I review. This shows that Premiere is designed mostly for professional teams rather than enthusiasts who may also want to use its power. The Pros will likely have a full Creative Cloud subscription which would let them get the sounds through Adobe Audition. Final Cut Pro and most other consumer-level video software come with these sound effects available right in the program.
Essential Sound does now provide one recent, very useful capability: Auto ducking for ambient sounds. This pulls back background noise during dialog or sound effects.
Titles and Captions in Premiere Pro
As you might expect, Premiere Pro offers a wealth of text options for titles and captions. It can import XML or SRT files. For titles, you get a great selection of fonts, including Adobe TypeKit fonts. You can choose leading and kerning, rolling, crawling, rotation, opacity, texture, and more. As in Photoshop, you can apply strokes and shadows to any font. Stroke styles let those with very particular typographic needs choose the type of caps the strokes have, including miter, round, and bevel. Advanced text animation, however, once again falls to After Effects. By comparison, enthusiast-level programs like PowerDirector and Pinnacle Studio offer a good selection of title animations right in the video editor.

(Credit: Adobe/PCMag)
you’re now able to add multiple shadows to your text layers, creating more unique and distinctive styles.
The spell checker and replace options mentioned above are present anywhere text is used in your project. This applies to multiple languages, too. Prior to this current version, working in multiple languages was a serious pain, as you had to take a trip to the Settings each time you needed to switch languages.
In the latest version of Premiere Pro, just type in the other tongue, and the tool will understand and conform. Left to right or right to left settings are set straight from the Essential Graphics panel.
Even better, you’re able to apply different scripts within the same graphic elements. This is bound to be a boon for multi-linguist movie-makers.
Automatic Transcriptions
One of the cooler recent features in Premiere Pro is Transcribe Sequence. This feature uses speech recognition technology to produce a text panel from spoken words in the sequence. It’s impressive, able to separate multiple named speakers. You can then jump to the place in the timeline by tapping on words in the panel, and pauses are marked with […], letting you find and remove them easily (but not yet automatically). The panel lets you edit the text and combine or separate text blocks, and its CC button automatically creates a caption track using the transcription.

(Credit: Adobe/PCMag)
One stellar new feature is Speech to Text. The simple name belies a range of truly fantastic speech-to-text tools, including the useful automatic transcription. Premiere Pro currently supports 14 different languages.
How it works is so simple: go to the Captions and Graphics workspace, then click on ‘Transcribe Sequence’. You have a series of fine tuning options, such as selecting the language (an important one, that), or even giving Premiere Pro the ability to recognise different voices, marking that in the transcript itself.
Now, of course, it’s not perfect, but it’s pretty great. And it’s easy to make alterations and fixes to the transcript, even replacing all the errors at once, if it couldn’t quite get someone’s name right, for instance.
Coupled with that is a link to a spellcheck. So, if you made a typo, you’ll be informed of that with the usual little red squiggly line under the problem word.
But that’s not all. As you play your sequence, you’ll be able to track the progress on the transcript itself.
This means Premiere Pro knows where the spoken words are located on the sequence. Why is that important? Because there’s a handy search field at the top. Search for a word or a phrase, and you’ll be taken straight there in the recording.
From now on, if you remember that someone mentioned something in an interview, you’ll be able to find it in seconds, rather than desperately play sections until you hope you bump into the right bit, usually by accident.
But it gets even better, as with the click of a button, you can create automatic captions for your videos based on that transcript. Now, you can make movies that are even more accessible to audiences.
That’s a really important step up for creators, and we’re delighted at how well the feature actually works.
Adobe is working on text-based editing (now in beta) that goes beyond this, which will let you build sequences using the transcription as well as move and delete clip areas from the panel.
The caption editing panel lets you redistribute words among the captions, each of which becomes a separate timeline clip. You can split or merge caption clips and edit the style of all the separate caption clips at once. When done, you can export to an SRT or text file or burn the captions into your video project
Premiere Pro Output and Performance
I made note above of the updated, simplified Export interface in Premiere, but that doesn’t mean you can’t go into every little detail about the file you’ll be rendering. You now see a list of common output targets along the left—Media File, YouTube, Vimeo, Twitter, and Facebook—along with Adobe’s own Behance and Creative Cloud online services. Importantly, you can export to as many as you want with one press of the Export button, after switching on the button for all those you want.

(Credit: Adobe/PCMag)
The categories in the middle all allow for fine-tuning, thanks to dropdown arrows. For example, click on Video here, and you can set not only the frame size, frame rate, and aspect ratio, but also the bit rate, color space, and time interpolation. For the rest of us, the new interface thankfully hides those brain-hurting settings.
Premiere Pro offers most formats you’d ever want, and for more output options you can use the Adobe Encoder, which can target Facebook, Twitter, Vimeo, DVD, Blu-ray, and many other devices. Encoder lets you batch encode to target multiple devices in a single job, such as mobile phones, iPads, and HDTVs. Premiere also can output media using H.265 and the Rec. 2020 color space, as can Final Cut. However, Final Cut requires you to buy the separate Compressor 4 for $49.99 for this functionality.

(Credit: Adobe/PCMag)
A Quick Export option lets you tap the up-arrow share icon at the top right, and you can produce the project with minimal fuss using a choice of seven preset formats: Match Source – Adaptive High, Medium, or Low Bitrate; 4K, 1080p, 720p, and 480p.
Render Speed Testing
Premiere Pro takes advantage of 64-bit CPUs and multiple cores. For render speed testing, I have each program join seven clips of various resolutions ranging from 720p up to 8K. I then apply cross-dissolve transitions between them and note the time it takes to render the project to 1080p30 with H.264 and 192Kbps audio at a bitrate of 16Mbps. The output movie is just over five minutes in length. I run this test on a Windows 11 PC sporting a 3.60GHz Intel Core i7-12700K, 16GB RAM, an Nvidia GeForce RTX 3060 Ti, and a 512GB Samsung PM9A1 PCIe 4.0 NVMe SSD.
Premiere Pro sits near the top of the leaderboard, with a dazzling time of just 37 seconds. The program did not crash on the PC as it had in the past, and the way Final Cut still sometimes does on the Mac in my testing. Premiere periodically auto-saves your work, in case you forget to save explicitly.
Adobe Premiere Pro on the Mac
Premiere Pro offers native support for Apple’s proprietary silicon chip. According to Adobe’s own internal tests, “thanks to new hardware acceleration, 4k, and 8K ProRes are now up to 5x faster on M1 Pro and M1 Max MacBook Pros.”
This also includes impressive hardware acceleration when working with the hi-res HEVC file format. Adobe says exports in HEVC “are faster with macOS 12 on M1 Macs. Hardware encoding is now enabled for DCI 4K and 8K HEVC exports, resulting in significantly faster performance.”
It’s always good when the big players back a new silicon endeavor. It’s one of the reasons why the Macbook tops our round-up of the best video editing laptops.
A good portion of video editors prefer working on Apple Macintosh computers, so naturally Premiere Pro is available on that platform. It now runs on the new Apple Silicon-based computers natively. The macOS version matches the Windows version feature-for-feature. I tested the macOS version on a 3.1GHz MacBook with Intel Core i5 and 8GB RAM, which is admittedly not a video-editing powerhouse.
My test project took Premiere Pro 2:31 (min:sec) to render on the test MacBook Pro. That compares favorably with Premiere Elements’ 7:31, but not so much with CyberLink PowerDirector, which did the deed in a mere 57 seconds. Final Cut Pro took 3:55 in two tests but then suffered system instability.
Alternatives To Adobe Premiere Pro
If you need something cheaper and easier:
The two main competitors to Premiere Pro are VEGAS Pro and Final Cut Pro, both of which are cheaper and easier to use.
- Windows users can pick up VEGAS Pro, which is also capable of handling the special effects which you’d need Adobe After Effects for.
- Mac users can pick up Final Cut Pro, which is the cheapest and easiest to use of the three programs.
If you need special effects:
Largely absent from Premiere Pro is the ability to create snazzy special effects. Adobe expects you to pick up a license for After Effects to handle these within their Creative Suite, which will cost you another $19.99 a month. VEGAS Pro is a fully-featured program that can handle both video editing and special effects.
Worthy of the Red Carpet
There’s no denying that Premiere Pro can do everything the professional video editor needs, and Adobe’s pro video editing software takes the lead when it comes to collaboration features. Its close integration with After Effects, Photoshop, Audition, and the whole Creative Cloud suite is a definite boon, too. It’s a massive program with an enormous set of capabilities that even a lengthy review like this can hardly do justice to.
With its large tool set, fine performance speed, and rich ecosystem, Adobe Premiere Pro earns an Editors’ Choice award for professional video editing software. Apple Final Cut Pro’s interface is more innovative in some ways, and the app adds beneficial tools, such as Roles, Auditions, and Clip Connections, making it a co-winner in the category. For home enthusiasts, our Editors’ Choice programs are Corel VideoStudio and CyberLink PowerDirector.
Adobe Premiere Pro vs Adobe After Effects: what’s the difference?
Adobe Premiere Pro and Adobe After Effects are Adobe’s top video post-production tools.
In a nutshell, the difference between Premiere Pro and After Effects is that Adobe Premiere Pro is video editing software and Adobe After Effects is VFX software.
Film & TV professionals use the non-linear editor (NLE) Premiere Pro to cut and splice videos together. Then boot up After Effects to add special effects and animation to the footage.
When you compare After Effects and Premiere Pro, you’ll still find a few similarities. Both industry-standard tools offer software for editing videos and adding basic text effects. They’re both intensely powerful, with TechRadar Pro awarding each the maximum 5 stars in their respective reviews. And the easy, seamless Adobe user experience is present in both.
However, there’s no real Adobe Premiere Pro vs Adobe After Effects. These aren’t rival products – they’re built for different parts of post. Ultimately, as part of the Adobe Creative Cloud toolset, After Effects and Premiere Pro were designed to work perfectly together.
If you’re still undecided about which visual effects software is best for you, try our guide to the best Adobe After Effects alternatives.
The Bottom Line
Effectiveness: 4.5/5
Nobody does it better than Adobe when it comes to color. The color and audio editing areas are extremely powerful and relatively painless to use. The half-star dock in rating comes from the performance issues I encountered when attempting to apply effects to my videos. It’s a problem I never encountered when testing VEGAS Pro on the same computer.
Price: 3/5
It costs $19.99 per month for an annual subscription, which adds up quickly. If you need special effects in your movies, then it’ll cost you another $19.99 a month for Adobe After Effects. In my opinion, the subscription model is at odds with the intentions of the program. It would make a lot of sense if the program were designed to be intuitive or easy to use, because then casual video editors could subscribe to Premiere Pro when they needed it and drop the subscription when they didn’t.
However, The program is not for the casual video editor. It’s designed for professionals in need of the highest quality possible, which means you’ll probably spend more on Adobe subscription fees than you would have spent paying for another video editor.
Ease of Use: 3.5/5
Those who have a high degree of familiarity with other tools in the Adobe Creative Suite might find it easier to use Premiere Pro than other video editing programs, but the majority of users will find it overwhelming at first. The program’s UI feels restrictive at times and requires some practice before it can be used swiftly. That said, once you get down all the hotkeys and know where to look, the UI becomes a tremendous asset.
Support: 5/5
It is the most widely used professional quality program of its kind. You’ll be hard-pressed to encounter a problem which you can’t solve with a Google search. Adobe also offers some useful introductory videos to help you get started with this video editing program.
Adobe Premiere Pro’s support
Adobe offers a reasonable amount of guidance and support for all Adobe product users. Adobe’s User Guide website is chock-full of Adobe Premiere Pro tips in the form of both written and video tutorials. Beginners and experts can learn everything from installing Premiere Pro to multichannel audio mixing from the website.
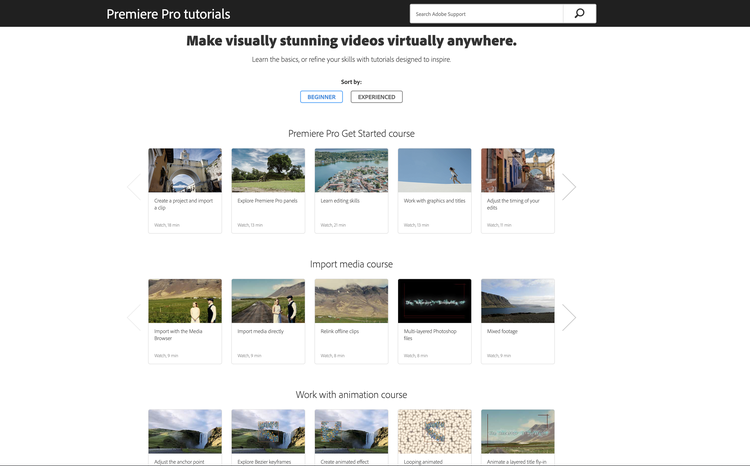
Premiere Pro’s online resource for video tutorials ranging from first steps to advanced editing. Image source: Adobe Premiere Pro website.
Additionally, when you open Premiere Pro, tutorials for popular skills are available to get you going. Adobe currently hosts live webinars with experts covering topics in Photoshop and Illustrator, and it would be helpful if they tied in some Premiere tools too!
If you still can’t find any answers, YouTube hosts a ton of helpful user content. It’s not always the easiest to find, or the most instructional content, but it can be used as a last resort.
All of these resources are free, so if you’re a small business you can limit training and development costs!
Frequently Asked Questions (FAQ)
What is Adobe Premiere Pro?
It is a video editing program for serious hobbyists and professionals. It’s the most widely used professional quality video editor in the world for a good reason, but it comes with a steep learning curve.
What can I do with Premiere Pro?
The program modifies and splices together video and audio files to make movies. What separates Premiere Pro most from its competition is its finely tuned color, lighting, and audio editing tools. It also integrates with the rest of the Adobe Creative Cloud, most notably with After Effects to create 3d special effects for your movies.
Is Premiere Pro safe to use?
The program is 100% safe. Adobe is one of the most trusted software companies in the world, and a scan of the folder containing Premiere Pro’s contents with Avast turned up nothing suspicious.
Is Premiere Pro free?
It costs $20.99 a month if you go for the annual subscription plan — as a standalone program. It also comes included with the rest of the Adobe Creative Cloud for $52.99 a month.
-
Absolutely. New users can get editing with minimal guidance.
-
Yes. Adobe Premiere’s price is cheaper than some competitors and includes consistent upgrades from Adobe.
-
Of course. Premiere has the tools needed to create short- or long-form social media content across all platforms.
-
Premiere Pro includes effects, transitions, color options, and motion graphic templates to take your content to the next level.
I have a complete Adobe Premiere Pro review where I analyze all the features of this product.
We discuss if Premiere Pro supports MKV files and how to handle MKV files via Encoder. Anyway, we consider that the industry standard is that you convert MKV to MP4 and stick to that container format.
Also, if MOV files are supported and how to override the MOV glitch.
We analyze the situation related to the lack of support inside Adobe Premiere Pro for WebM format files and why Adobe does not support it. While we do not recommend the WebM format at all, I explain how to overcome this issue with the FNord WebM free software. The recommended approach is to go into industry standards and convert WebM to MP4 to use it in Premiere Pro. A bit related to this is the question about how to handle the VP9 codec in Premiere Pro, as it s a problem for YouTubers who want to export video produced and rendered there.
As there is no lifetime license anymore available for the Adobe suite, we responded to the question in the comments´ section about why Adobe Premiere Pro is so expensive, and, in general, why digital video editing software is so expensive.